Thursday, December 31, 2009

Crab Cakes With Piment D'espelette Alioi

Gingerbread, sugar cookies, truffles, scones slathered in butter and jam...oh my! I want seafood now. And the only cake I want is a crab cake :-) I think they'll be a perfect way to ring in 2010. I actually can't believe we are entering a new decade in what still seems like a new century. 2010 sounds too much like a year that you would enter in a time machine and not with the clink of Champagne glasses. Alas, the future is now and there is no time like the present to celebrate the day. These crab cakes are great as appetizers, a light meal or for brunch. I prefer mine to be made with top quality crab, with as little filler as possible so that the true star shines through. I was able to get some really fresh crab meat from Whole Foods, but fresh crab meat is available in large food stores in most areas. My favorite recipe comes from Tyler Florence who I have a huge foodie crush on. He just knows how to take a dish and give it his own flavor. His version is simply made and goes perfectly with a Champagne toast. I made an Piment D'espelette Alioi that I created with some experimentation. I used the piment d'espelette that I bought at a Paris food market this fall. To make the sauce quickly, I used prepared olive oil mayonnaise (for ease and also to not use raw egg yolks), piment d'espelette*, garlic, Dijon mustard and lemon juice. This comes together in a snap and any leftover is good on just about anything! For an Asian sauce, I also want to try some chili sauces that Ju, at The Little Teochew and Zurin, from Cherry on a Cake have brought to us. Take a peek at their posts, I'm sure you'll be delighted.

However you ring in the New Year, whether it is quietly at home or at a large party celebration, I wish you the very best for a safe, happy and healthy 2010. Happy New Year! Ching-Ching!!

Crab Cakes
(Adapted from "Tyler's Ultimate", by Tyler Florence)

Extra-virgin olive oil
1 onion, finely minced
2 garlic cloves, finely minced
1 pound jumbo lump crab meat
1 1/2 cups fresh bread crumbs (made from 3 or 4 slices of white bread with the crusts removed)
2 tablespoons mayonnaise
1 large egg white
juice of 1 lime
1/4 cup chopped fresh cilantro, plus whole leaves for garnish
Kosher salt and ground black pepper

Over medium heat, lightly cover the bottom of a frying pan with olive oil. Add the onions and garlic and cook for 5-7 minutes, until the onion gets somewhat caramelized. Put that into a bowl and fold in the crab meat, bread crumbs,mayonnaise,egg white, lime juice, and cilantro, mixing until just well blended. Season with salt and pepper. Shape the mixture into 6 fat crab cakes. Put them on a plate and put them into the refrigerator to chill.

In a large sautè pan, just cover the bottom with olive oil and heat over medium heat. Add the crab cakes and cook for about 4 minutes on each side, or until they are nice and crisp. Loosely cover if they need more time to cook in the center.

Piment D'espelette Alioi

1 cup good quality olive oil mayonnaise
1 teaspoon, or more to taste, piment d'espelette**
2 tablespoons fresh lemon juice
3-4 garlic cloves, peeled and finely minced
2 teaspoons Dijon mustard
olive oil
*piment d'espelette is a mild chili pepper from the French Basque area of France. It has a mildly hot and slightly sweet round flavor.
**Ground cayenne pepper may be substituted, just use about half of the amount.

Into the mayonnaise, mix the pepper, lemon juice, minced garlic, and Dijon mustard. Stir to mix well. Drizzle in a small amount of olive oil to reach the consistency you prefer. Refrigerate until serving.

Makes one cup.

Piment D'espelette
Aioli recipe click here.

Crab Cake recipe click here.

Stumble Upon Toolbar

Monday, December 28, 2009

Please Come For Tea And Scones

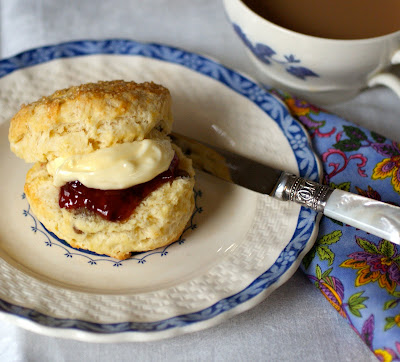
Maybe it's the English in me or maybe it is the sheer comfort of tea and scones. I think it is both. Afternoon tea in Greenwich, England last week just warmed me to the soul. Scones with clotted cream or whipped cream and jam are referred to as Cream Tea. Since the USDA frowns when I bring clotted cream back into the US, I whip unsalted butter until it is light and creamy to substitute this delight. Strawberry or raspberry jam are traditionally served with the scones and cream. A nice hot cup of tea never had better company. Fruited scones have raisins or currants which I'm not crazy about. Today I tried golden raisins, which have a milder flavor, and I liked them. You may also put dried cranberries or cherries, or fresh blackberries or blueberries in them. They are not traditional, but they sure are good! There are many scone recipes around with different theories and mine comes from the old American standby, "The Joy of Cooking." I know a winner when I taste it.

Scones
(Adapted from the "Joy of Cooking")

Preheat oven to 450 degrees

Sift together in a large bowl:
1 13/4 cups sifted all-purpose flour
2 1/4 teaspoons baking powder
1 tablespoon sugar

1/2 teaspoon salt

Cut into these ingredients, until the size of small peas, using a pastry blender or 2 knives:
1/4 cup cold butter

Beat in a separate bowl:
2 eggs

Reserve 2 tablespoons of this mixture. Stir into the flour/butter mixture and beat in:
1/3 cup cream
1/3 cup raisins, currants, cranberries or any other dried fruit that you desire

Put in any dried fruit and stir. Make a well in the dry ingredients. Pour the liquid into it. Combine with a few swift strokes. Handle the dough as little as possible, or it will be tough. Place on a lightly floured board. Pat into a 3/4-1 inch thick circle. Cut into 2 inch rounds or pie shaped wedges. Brush with the reserved beaten egg and sprinkle with sugar.Place on a greased or nonstick baking sheet and bake for about 15 minutes or until golden brown.Makes 12 scones. Serve with whipped unsalted butter and jam.
Scone recipe click here.

Stumble Upon Toolbar

Sunday, December 27, 2009

Time in Greenwich

There was a definite nip in the sunny December air as we took the tube to Greenwich, England from London.
Wanting to take a break from the madding shopping crowds, we rode to this quintessential English town that is just 6 miles from London. A short walk brought us to the Old Royal Navel College which stands on the grounds of the birthplace of Henry Vlll, Queen Mary l and Queen Elizabeth l. This was originally the location of Greenwich Palace, or Palace of Placentia. The Old Royal Navel College, designed by the renowned English architect Christopher Wren, was originally built in 1696-1712 as the Greenwich Hospital. The most spectacular parts of the Old Royal Navel College are the Baroque Painted Hall and the Chapel. Services are held here every Sunday. We were here on a Saturday so we didn't get to hear this magnificent organ that is flanked by Grecian columns. The Spiral Tulip Staircase is thought to be the first spiral staircase in Britain. Some believe it is haunted, but these are my friends walking down...I promise. Outside looking up, you can see the Royal Observatory at the top of the hill. This was the original location of the Greenwich Castle and was a favorite place for the insatiable Henry the Vlll to bring his mistresses, since they could easily be shuttled between the Palace and Castle. After a steep climb to the top we arrived at the Observatory. A very lively gentleman was giving some background history, by the Prime Meridian, 0 degrees longitude line. Until 1954 Greenwich Mean Time (GMT) was determined here. There is a museum here that takes us through time, literally and the process of how latitude and longitude were devised. After touring the museum, it was time for tea at the Pavilion Tea House. It wasn't a fancy place, but the hot tea and cream scone couldn't have tasted better on this chilly afternoon. By the time we finished, the short winter's day was winding down. The walk back down into town brought us to a majestic gate to the streets lit in Christmas regalia. It was a wonderful day with my friends. My only regret was that I had brought my point and shoot camera with me instead of my DSLR, which my back thanked, but my eyes objected to. Each time I don't bring my DSLR, I swear I'll never do it again, but I do :-(

Next time.

Stumble Upon Toolbar

Tuesday, December 22, 2009

Let It Snow...

Let it snow, let it snow, let it snow! What do you do when life gives you a snowstorm? Make snowmen...truffle snowmen. I'm on a truffle roll. I had some ganache made for truffles to give to my crew on our trip before Christmas, so I thought I'd try making truffle snowmen. They were fun to make, but like my penguin truffles, a little labor intensive. I experimented and think I have come up with the easiest way to do it. This recipe is for 20 snowmen, but I made about 10 and made single truffles with the rest of the ganache. They are really more of an accent, and not something you'd want to give some a dozen of. It is said that to be a good truffle maker, you need cold hands and a warm heart. So dust off your small motor skills, grab your patience, take the phone off of the hook and let it snow!

Snowman Truffles

For the ganache:
12 ounces bittersweet chocolate
1 1/4 cups heavy cream

For the dipping:
12 ounces white chocolate

For the buttons:
1/4 cup mini chocolate chips

For the twig arms, eyes and mouth:
1/3 cup melted semi-sweet chocolate (approximate)
wooden skewer
toothpicks

For the "carrot" noses:
2 tablespoons melted white chocolate
orange food coloring

To make the ganache: Break 12 ounces bittersweet chocolate into small pieces and process in a food processor until very fine. Heat the cream until just boiling and pour through the food processor feed tube in a steady stream, with the motor running. Process just a few seconds, until smooth. Transfer to a bowl to firm. This should take a few hours at room temperature. You may also put it in the refrigerator. Once firm, using a 1 inch melon baller or ice cream scoop, scoop out balls of ganache and place on a parchment lined tray.
Dust hands with powdered sugar and roll ball between your hands to smooth into a round ball. For the snowmen, make 3 balls for each one. Make the largest 1 1/8 inch, make the middle size 1 inch and make the smallest 3/4 inch. Place on a parchment lined cookie sheet. Stack them on top of each other, largest on the bottom and smallest on the top. Press down slightly so they are flat on the bottom. Put aside. To make the "carrot" noses:
Dab a toothpick into the orange food coloring and mix thoroughly into the melted white chocolate. Color the melted chocolate a carrot orange color. Put the colored chocolate into a small zip lock bag, seal and diagonally snip a 1/8 inch piece off of the bottom corner. On a parchment or plastic lined plate, pipe the chocolate into carrot noses by pressing the chocolate out of the bag and then tapering to a point. Make 20-25 and let harden.
To make the "twig" arms:
Place the melted semi-sweet chocolate in a small zip lock bag,
seal and diagonally snip a 1/8 inch piece off of the bottom corner. Onto a parchment lined tray, pipe a 3/8 inch wide "V" shape. Then pipe a straight line through the "V" continuing for about an inch long. Make about 50. Let harden.
To coat in white chocolate:
Melt 12 ounces white chocolate by breaking it into a medium bowl placed over a pot of hot water. The bowl must not touch the water and the water must not simmer, but just remain hot. Stir until melted and then take off of heat and cool until it is about 84 degrees, or dab a small amount on your upper lip. It should feel slightly cool.

With a wooden skewer, poke a hole at a slight downward angle into the middle truffle of the stack of 3. Carefully insert a "twig" arm into the hole. They are delicate, so be careful. Place a grilled rack (cooling rack) over a lined cookie sheet. Holding the stack in your fingers over the slightly cooled melted chocolate, carefully spoon the white chocolate down the top and sides of the snowman. Do not let the white chocolate get onto the twig arms. Make sure the snowman is covered and let the excess chocolate drip off. Then place on the grilled rack to continue dripping. The carrot nose may be placed on while the chocolate is still soft or applied later with a dab of melted white chocolate as the glue. The mini chocolate chip buttons may also be placed on at this time or later with a dab of melted white chocolate. Let harden.

Remove from the rack carefully by slicing underneath the snowman and place on a parchment lined cookie sheet. Using a toothpick dipped into melted semisweet chocolate, place 2 dabs of chocolate for the eyes. For the mouth place 4 smaller dabs, into a smiling face. Don't worry about any pointy ends, once hardened they can be broken off if desired.

Let the snowmen harden at room temperature.

Have fun by displaying on a bed of freshly fallen powdered sugar and with a satin ribbon (1/4 inch wide) scarf tied around the neck. A little glue stick glue helps to keep the ends of the tied scarf in place.Makes 20-25 truffle snowmen.

Snowman Truffles recipe.

I always try and use the least amount of packaging as possible, and I thought I'd share a way I wrap presents. Many times I use extra fabric and wrap a present with it. Or I make the wrapping part of the present, like a scarf or tea towel. Years ago I bought some silk organza napkins...don't ask me why, and they seem better suited to wrapping presents than wiping mouths. Just place the present in the center and bring opposite corners together and tie. I also recycle old Christmas cards to use as gift tags the following year. I think this makes for a prettier and more interesting package.

Enjoy your holidays!


Stumble Upon Toolbar